Configuring ASP.NET with IIS

هذه المقالة متوفرة أيضا باللغة العربية، اقرأها هنا.

Problem

The problem arises when you install IIS after installing ASP.NET. If you do this, IIS will configure itself for the ASP.NET version that ships with your Windows edition that might be an older version (e.g. version 2.0) and you won’t be able to run any web application built using a later version of ASP.NET.

Solution

The solution is simply to reconfigure ASP.NET for IIS. You don’t need to reinstall ASP.NET or the .NET Framework; you just need to reapply ASP.NET configuration to the IIS.

When you open the IIS Manager, you can check Application Pools and see which version of ASP.NET is currently configured. Here, we have IIS installed after ASP.NET, so the IIS is configured for version 2.0 (as you can see in figure 1.)

Figure 1 - IIS Application Pools Configuration - .NET 2.0

To solve this, we’ll get help from the aspnet_regiis.exe tool that will reconfigure IIS to the version of ASP.NET you choose. This tool is located in %windir%Microsoft.NETFrameworkv<version> (replace <version> with the version of .NET Framework you like to use.)

Let’s get this done. Open the Command Prompt in administrative mode (Start->Cmd->Ctrl+Shift+Enter) and go to the .NET Framework directory mentioned before.

Now, run the ASP.NET IIS Registration tool using the following command:

aspnet_regiis.exe -i

When the tool finishes its job, you’ll get a message inform you that everything was completed successfully.

Now go to IIS Manager again and check the Application Pools. You can now find that IIS is configured for ASP.NET 4.0 which is installed on that machine (see figure 2.)

Figure 2 - IIS Application Pools Configuration - .NET 4.0

Enjoy your day!

Installing IIS on Windows XP, Vista, and Windows 7

هذه المقالة متوفرة أيضا باللغة العربية، اقرأها هنا.

Introduction

When you install Windows, it doesn’t automatically install IIS for you. Instead, you have to install it manually. If you have downloaded a new version of IIS from IIS website, you can use the setup file to install IIS on your machine. If you prefer the version of IIS that ships with your Windows edition, you can install it using Windows Components installer, and that what we are going to do next.

IIS on Windows XP

To install IIS on Windows XP follow those steps:

  1. Go to Control Panel -> Add or Remove Programs -> Add/Remove Windows Components.
  2. Go down in the list and check Internet Information Services (see figure 1.)
  3. You can also click Details to choose additional services and functionalities to install (e.g. SMTP service.)
  4. Click Next and provide your Windows CD or Windows installation files folder to continue.
Figure 1 - Installing IIS on Windows XP

Now you can go to Control Panel -> Administrative Tools and run IIS from there. You can also browse to http://localhost and see your new homepage (enjoy!)

IIS on Windows Vista and Windows 7

Installing IIS on Windows Vista/7 is very similar, just follow those steps:

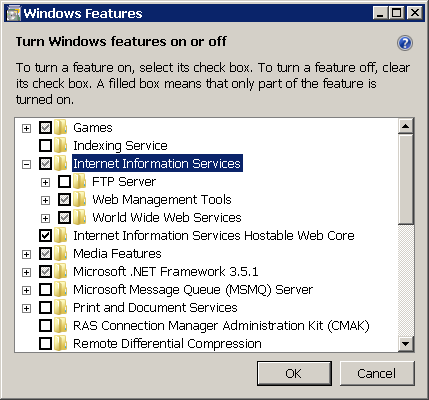
  1. Go to Control Panel -> Programs and Features -> Turn Windows Features on or off.
  2. In the Windows Features dialog (see figure 2,) check Internet Information Services node.
  3. You can also select any additional services to install from the child nodes (e.g. FTP services.)
  4. Click OK to complete the installation. A system reboot might be required.
Figure 2 - Installing IIS on Windows Vista and Windows 7

Now go to Control Panel -> Administrative Tools to run the IIS. You can also go to http://localhost to see your new homepage.

Running IIS

Personally, I don’t like running IIS from Administrative Tools. I like to use the Run command to run everything on my PC and that’s, on my opinion, 3 times faster than everything else (of course when using the keyboard not the mouse.)

To be able to launch IIS from the Run command, you need to add the IIS directory (%windir%System32inetsrv) to the command search path which is available in system environment variables, and that can be done using the following steps:

  1. Open System Settings (right click Computer and choose properties, or preferably by pressing Start + Pause Break buttons.)
  2. If you are using Windows Vista or Windows 7 choose Advanced System Settings from the left pane.
  3. Go to Advanced -> Environment Variables (see figure 3.)
  4. In the bottom list (System Variables) select Path and click Edit.
  5. Beware not to fail this step. In the Variable Value field, add the symbol ; to the end of the value (if it’s not already added) and then append the following text:
    %windir%System32inetsrv
  6. Click OK 3 times.
Figure 3 - Setting the Path Environment Variable

Now go to Run (Start + R) and write inetmgr (the name of the IIS Manager) to run the IIS Management tool.

Have a nice day!