Examples of COM Automation in Silverlight 4

هذه المقالة متوفرة أيضا باللغة العربية، اقرأها هنا.

Read: Introducing COM Automation in Silverlight 4

Sample 1: TalkingApps Preview Download
Sample 2: FeaturedBlogs Preview Download
Sample 3: FileSurfer PreviewDownload


Contents

Contents of this article:

  • Contents
  • Introduction
  • Concepts
    • Finding COM Components
    • Accessing the COM Component
    • COM and Late Binding
  • Preparing Your Project
  • OOB Characteristics
  • Sample 1: Talking Apps
  • Sample 2: Office Automation
    • Word Automation
    • Outlook Automation
    • Excel Automation
  • Sample 3: File Surfer
  • What’s next


Introduction

In the previous lesson we talked about COM automation support introduced in Silverlight 4 and we said that COM automation is available only for Silverlight OOB (Out-of-Browser) applications that have Elevated Trust, and that’s one of the security restrictions imposed by Silverlight.

Today, we’re going to talk about COM automation in more details and give few Silverlight examples that make use of this great feature.


Concepts

Finding COM Components

COM components expose their interfaces and classes via Windows Registry. COM classes exposed to public available in this machine are registered in the Registry at HKCRCLSID (which is a repository for all COM classes registered in this machine.) Because the machine may have thousands of COM components installed, every COM class is identified with a GUID (Globally Unique Identifier.) This GUID is very long and difficult to remember (it’s something like {xxxxxxxx-xxxx-xxxx-xxxx-xxxxxxxxxxxx}) so COM classes are using another way to identify themselves; that is the ProgID (Programmatic ID.)

ProgID for a COM class is a simple and clear string that identifies that class and represents it. For example, Microsoft Word exposes its functionalities through a COM class that you can reach it using the ProgID Word.Application. So, instead of the GUID of a class, you simply refer to it using its simple and easy-to-remember ProgID.

Then, how to find the right COM component? Or how to know if a COM component exposes a certain functionality that I need? Google it, that’s the only way! If you are looking for a COM component that does something you need just google it. And always have the COM component in your right hand, and have its documentation in the other. And don’t miss a chance to ask MSDN for help.

Accessing the COM Component

Now you have the COM component and know what to do with it. The next step is to create a new instance from the COM class using its ProgID. This is can be done using the AutomationFactory class found in the namespace System.Runtime.InteropServices.Automation (exist in System.Windows.dll.) This class exposes a few functions and only one property. The only property is IsAvailable that returns whether or not COM is supported by the operating system (COM is supported only in Windows.) Of the few functions AutomationFactory supports, we care about only CreateObject() that takes the ProgID as an input and returns the created object.

COM and Late Binding

When you assign an object to a variable that assignment can be made as early-binding or late-binding.

Early-binding is that what you make every day and all the time. By default, object assignment is made as early-binding, means that you create a variable of specific type and bind that object to that variable. Then, the compiler always knows the type of object assigned and the members (methods, properties, etc.) it supports and that allows him to do some checks, optimizations, and perform some memory allocations before application start.

In addition, early-bound variables can be thought as strongly-typed objects, means that you can check for their exposed members, use some IDE features like Intellisense and Object Explorer, and also receive compiler errors when you try to make calls to members that don’t exist (for instance.)

Late-binding on the other hand is made at runtime, means that the compiler doesn’t have enough information about the type at compile time. That means that no type checks, no method lookups or Intellisense, no verifications, no optimizations, and also no compilation errors from the late-bound object.

Is there any benefit from late-binding? Does it have anything to do with COM? Actually, it’s not as ugly as you think, it has lots of benefits and it also the core of COM automation in Silverlight (and .NET 4.0 too.)

Late-binding allows you not to embed COM types and interfaces in your .NET assembly, and that would help reduce your application size dramatically, and also protects you from versioning fails and falling in the DLL Hell.

Worth mentioning that late-binding was introduced in .NET 4.0 via the dynamic keyword and DLR (Dynamic Language Runtime) libraries. Before .NET 4.0, late-binding was supported only via reflection. Regarding Silverlight, late-binding was introduced in version 4 supporting easier COM automation and HTML DOM.

After all, to create a COM object in Silverlight you first ensure that Microsoft.CSharp.dll and Microsoft.Core.dll are referenced to your project. After that, you can call AutomationFactory.CreateObject() and assign the returned object to a dynamic variable and start coding with it.


Preparing Your Project

Now, let’s get to work. We’ll now prepare a Silverlight application for communication with COM components. Remember that this process requires a Silverlight 4 application running as OOB and having the elevated trust.

Start with a Silverlight project and ensure that you have selected version 4 from the New Application dialog. (The application will run as OOB, so you can safely uncheck the web application hosting option.)

Figure 1 - Creating New Silverlight Application

After creating the project, open project properties and from the bottom of the Silverlight tab check the option “Enabling running application out of browser” (check figure 2.)

Figure 2 - Configuring Silverlight to run as OOB

Then click Out-of-Browser Settings button and from the bottom of this dialog too check the “Require elevated trust when running” option (check figure 3.)

Figure 3 - Enabling Elevated Trust

Now click OK and close project properties and save the project.

Next, add support for dynamic variables and late-binding feature to the project by referencing Microsoft.CSharp.dll (and System.Core.dll too if it’s not currently referenced) in the project.

Figure 4 - Adding Reference to Microsoft.CSharp.dll


OOB Characteristics

First of all, you can launch your OOB application by clicking Run or pressing F5 (figure 5.)

Figure 5 - Running OOB Application

OOB applications can also run in a web page (by default, you’ll redirect the user to a web page where he can install the application to his PC.) Try browsing to TestPage.html (in Bin<debug|release>, check figure 6) or referencing the project in web application Keep in mind that COM support is not available for OOB applications running in the web.

Figure 6 - OOB Applications from the Web

When running OOB application from a web page the user can right click the application and chooses to install it on his machine (figure 7.) This behavior is the default, but you can disable it from the Out-of-Browser Settings dialog (check figure 3.)

Figure 7 - Installing Silverlight OOB App

When trying to install an OOB application that requires elevated trust the user may accept a security warning before the installation goes on (figure 8.)

Figure 8 - Installing Elevated Trust App

You can also order the application to launch the installation process via Application.Install(), but this requires to be called in response to a user-initiated action (e.g. clicking a button.)

Another great feature of ApplicationClass is IsRunnignOutOfBrowser that returns whether the application is running OOB.


Sample 1: Talking Apps

Our first example is an application that makes use of the speech API and speech COM library, sapi.dll, to read a textual input from the user. The code uses the SAPI.SpVoice class that has the Speak() function that we’ll make use of.

First, design a window that has an input text box and a button to read the text. You might get help from the following XAML:


The application might look like this:

Figure 9 - The Talking App

Now, start coding the Click event of the button:

Remember to include a using statement for System.Runtime.InteropServices.Automation.

private void Button_Click(object sender, RoutedEventArgs e)
{
    if (!Application.Current.IsRunningOutOfBrowser)
    {
        MessageBox.Show("This application cannot be run from the browser.");
        return;
    }
    if (!AutomationFactory.IsAvailable)
    {
        MessageBox.Show("Your operating system does not support COM.");
        return;
    }

    try
    {
        using (dynamic obj = AutomationFactory.CreateObject("SAPI.SpVoice"))
        {
            obj.Speak(inputTextBox.Text);
        }
    }
    catch (Exception ex)
    {
        MessageBox.Show("An error has occurred.n" + ex.Message);
    }
}

In the previous code we have checked first for whether the application is running as OOB or not (using Application.IsRunningOutOfBrowser property.) After that, we made a second check for ensuring that COM automation is supported by the operating system (i.e. the user must be working on Windows.)

Then, we have created our first COM object using AutomationFactory.CreateObject() function specifying the class ProgID which is SAPI.SpVoice. As you see, we have assigned the created object to a dynamic variable and we have also encapsulated the object in a using statement to ensure that system resources get released quickly as soon as we finish working with the object.

You can try an updated version and download it from here:

PreviewDownload


Sample 2: Microsoft Office Automation

We won’t dig into Microsoft Office SDK or even one of its products, we don’t have much space here, and it also requires a punch of articles in its own. Instead, we’ll have just a few examples and two samples that clear up the ambiguities of COM automation. More help can be found in the documentation of the Office programming model available in MSDN.

Word Automation

Microsoft Word exposes its programming model via COM components that you can reach its main Application object via the ProgID Word.Application. This model allows you to almost do everything programmatically from creating and opening documents to saving and printing them, even running macros and recording them is available through this model.

The following code creates a Word document and writes some text to it:

using (dynamic app = AutomationFactory.CreateObject("Word.Application"))
{
    dynamic doc = word.Documents.Add();

    dynamic par = document.Content.Paragraphs.Add();
    par.Range.Text = "Hello, World!";
    par.Range.Font.Bold = true;

    word.Visible = true;
}

More information about Word object model can be found here: http://msdn.microsoft.com/en-us/library/kw65a0we.aspx.

Outlook Automation

Like all other Microsoft Office products, Microsoft Outlook can be managed completely by the code using its programming model exposed through the ProgID Outlook.Application. The following code sends an email using Outlook (thanks to Jeff Prosise for providing the code):

using (dynamic app = AutomationFactory.CreateObject("Outlook.Application"))
{
    dynamic mail = app.CreateItem(0);
    mail.Recipients.Add("");
    mail.Subject = "Hello, World!";
    mail.Body = "Silverlight COM Automation is so cool ;)";
    mail.Save();
    mail.Send();
}

A full documentation of Outlook programming model can be found here: http://msdn.microsoft.com/en-us/library/ms268893.aspx.

Excel Automation

The following sample uses Excel automation to export some data of a DataGrid to an Excel file:

Figure 10 - The FeaturedBlogs App

PreviewDownload

More about Excel programming model can be found here: http://msdn.microsoft.com/en-us/library/wss56bz7.aspx.


Sample 3: File Surfer

The last sample here makes use of the most powerful file managing COM component exposed through the ProgID Scripting.FileSystemObject. This class gives your application the power to do almost everything on file system even if your Silverlight application lonely (without COM support) that runs with elevated trust don’t have such those privileges (remember what we have said about COM automation? It’s the ultimate power for Silverlight.)

The next is an example of a code that creates a text file on drive C: and writes some text to it:

using (dynamic fso = AutomationFactory.CreateObject("Scripting.FileSystemObject"))
{
    string path = "C:\file.txt";

    dynamic file = fso.CreateTextFile(filePath, true);
    file.WriteLine("Hello, World!");
    file.Close();

    file = fso.OpenTextFile(filePath, 1, true);
    file.Close();
}

And the following is an application that helps you surfing the file system with no restrictions as if you were using File Explorer:

Figure 11 - The FileSurfer App

PreviewDownload


What’s next

You might like to check Justin Angel’s hot article about COM automation in Silverlight, lots of examples are available there.

Introducing COM Automation in Silverlight 4

هذه المقالة متوفرة أيضا باللغة العربية، اقرأها هنا.

Read: Examples of COM Automation in Silverlight 4

SilverlightIn April 2010 Silverlight 4 was released to the world with one of its great features ever, COM-automation support, that allows you to create cutting-edge applications that do everything you can imagine.

What COM is

COM (Common Object Model) is a Microsoft technology introduced in 1993 and currently used by many programming languages (including C++ and VB6) for developing and building software components. Simply, you can think about COM as the counterpart for .NET assemblies in languages like C++ and VB6, .NET assemblies hold program objects and so do COM components, there’re many differences of course and one of them is that COM components are much more capable than .NET assemblies and that what makes accessing them is a great improvement to Silverlight.

Today there’s much COM components available, Microsoft Office is an example of a COM-based SDK, lots of Windows features are introduced through COM interfaces (Text-to-Speech is a good example,) and lots of 3rd party software (e.g. Adobe Reader) expose their functionalities through COM-based interfaces. Thus, you can’t leave COM automation behind if you’re willing to create cutting-edge Silverlight applications that do almost everything.

Silverlight OOB Applications

Another great improvement to Silverlight over Adobe Flash is its support for installing and running offline as a desktop application with no network presence. Those Silverlight desktop clients are described as OOB (Out-of-Browser) applications and they have been introduced in Silverlight 3 and extended their functionalities in version 4.

OOB applications are sophisticated desktop clients that can run on any platform with no such code changes required. WPF applications are much capable of course but they support only the Windows platform.

Notice that COM is a Microsoft technology that won’t run in a non-Windows machine.

Silverlight 4 and COM

Starting from version 4, you have the ability to call COM-components through your Silverlight application with a small amount of simple and clear code. But don’t expect much, you still constrained by two security restrictions:

  1. Your application needs to be running OOB.
  2. Your application must have the Elevated Trust.

Both requirements are easy as two mouse clicks; you simply set application requirements in project properties.

Programmatically, to start communicating with a COM component you make use of the AutomationFactory class found in namespace System.Runtime.InteropServices.Automation (exist in the main System.Windows.dll.) Combined the AutomationFactory class with dynamic coding (and the dynamic keyword) you can create your COM objects in Silverlight and play with it.

In the next few lessons we’ll discuss Silverlight COM automation in details and see it in action though many useful examples that will move your application to infinity. Enjoy!


Building Applications that Can Talk

هذه المقالة متوفرة أيضا باللغة العربية، اقرأها هنا.

Overview

Stephen Hawking is one of the most famous people using speech synthesis to communicate

In this article we are going to explore the Speech API library that’s part of the TTS SDK that helps you reading text and speaking it. We’re going to see how to do it programmatically using C# and VB.NET and how to make use of LINQ to make it more interesting. The last part of this article talks about…… won’t tell you more, let’s see!

Introduction

The Speech API library that we are going to use today is represented by the file sapi.dll which’s located in %windir%System32SpeechCommon. This library is not part of the .NET BCL and it’s not even a .NET library, so we’ll use Interoperability to communicate with it (don’t worry, using Visual Studio it’s just a matter of adding a reference to the application.)

Implementation

In this example, we are going to create a Console application that reads text from the user and speaks it. To complete this example, follow these steps:

As an example, we’ll create a simple application that reads user inputs and speaks it. Follow these steps:

  1. Create a new Console application.
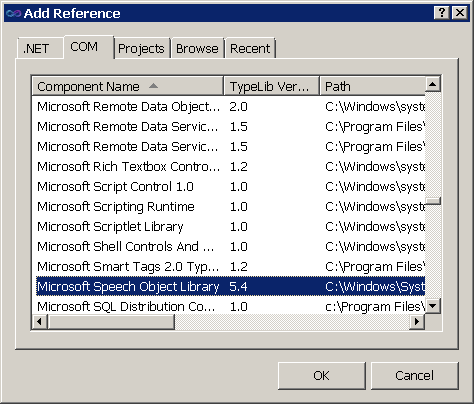
  2. Add a reference to the Microsoft Speech Object Library (see figure 1.)

    Figure 1 - Adding Reference to SpeechLib Library
    Figure 1 - Adding Reference to SpeechLib Library
  3. Write the following code and run your application:
// C#

using SpeechLib;

static void Main()
{
    Console.WriteLine("Enter the text to read:");
    string txt = Console.ReadLine();
    Speak(txt);
}

static void Speak(string text)
{
    SpVoice voice = new SpVoiceClass();
    voice.Speak(text, SpeechVoiceSpeakFlags.SVSFDefault);
}
' VB.NET

Imports SpeechLib

Sub Main()
    Console.WriteLine("Enter the text to read:")
    Dim txt As String = Console.ReadLine()
    Speak(txt)
End Sub

Sub Speak(ByVal text As String)
    Dim voice As New SpVoiceClass()
    voice.Speak(text, SpeechVoiceSpeakFlags.SVSFDefault)
End Sub

If you are using Visual Studio 2010 and .NET 4.0 and the application failed to run because of Interop problems, try disabling Interop Type Embedding feature from the properties on the reference SpeechLib.dll.

Building Talking Strings

Next, we’ll make small modifications to the code above to provide an easy way to speak a given System.String. We’ll make use of the Extension Methods feature of LINQ to add the Speak() method created earlier to the System.String. Try the following code:

// C#

using SpeechLib;

static void Main()
{
    Console.WriteLine("Enter the text to read:");
    string txt = Console.ReadLine();
    txt.Speak();
}

static void Speak(this string text)
{
    SpVoice voice = new SpVoiceClass();
    voice.Speak(text, SpeechVoiceSpeakFlags.SVSFDefault);
}
' VB.NET

Imports SpeechLib
Imports System.Runtime.CompilerServices

Sub Main()
    Console.WriteLine("Enter the text to read:")
    Dim txt As String = Console.ReadLine()
    txt.Speak()
End Sub

<Extension()> _
Sub Speak(ByVal text As String)
    Dim voice As New SpVoiceClass()
    voice.Speak(text, SpeechVoiceSpeakFlags.SVSFDefault)
End Sub

I Love YOU ♥

Let’s make it more interesting. We are going to code a VBScript file that says “I Love YOU” when you call it. To complete this example, these steps:

  1. Open Notepad.
  2. Write the following code:
    CreateObject("SAPI.SpVoice").Speak "I love YOU!"

    Of course, CreateObject() is used to create a new instance of an object resides in a given library. SAPI is the name of the Speech API library stored in Windows Registry. SpVoice is the class name.

  3. Save the file as ‘love.vbs’ (you can use any name you like, just preserve the vbs extension.)
  4. Now open the file and listen, who is telling that he loves you!

Microsoft Speech API has many voices; two of them are Microsoft Sam (male), the default for Windows XP and Windows 2000, and Microsoft Ann (female), the default for Windows Vista and Windows 7. Read more about Microsoft TTS voices here.

Thanks to our friend, Mohamed Gafar, for providing the VBScript.

.NET Interoperability at a Glance 3 – Unmanaged Code Interoperation

هذه المقالة متوفرة باللغة العربية أيضا، اقرأها هنا.

See more Interoperability examples here.

Contents

Contents of this article:

  • Contents
  • Read also
  • Overview
  • Unmanaged Code Interop
  • Interop with Native Libraries
  • Interop with COM Components
  • Interop with ActiveX Controls
  • Summary
  • Where to go next

Read also

More from this series:

Overview

This is the last article in this series, it talks about unmanaged code interoperation; that’s, interop between .NET code and other code from other technologies (like Windows API, native libraries, COM, ActiveX, etc.)

Be prepared!

Introduction

Managed code interop wasn’t so interesting, so it’s the time for some fun. You might want to call some Win32 API functions, or it might be interesting if you make use of old, but useful, COM components. Let’s start!

Unmanaged Code Interop

Managed code interoperation isn’t so interesting, but this is. Unmanaged interoperation is not easy as the managed interop, and it’s also much difficult and much harder to implement. In unmanaged code interoperation, the first system is the .NET code; the other system might be any other technology including Win32 API, COM, ActiveX, etc. Simply, unmanaged interop can be seen in three major forms:

  1. Interoperation with Native Libraries.
  2. Interoperation with COM components.
  3. Interoperation with ActiveX.

Interop with Native Libraries

This is the most famous form of .NET interop with unmanaged code. We usually call this technique, Platform Invocation, or simply PInvoke. Platform Invocation or PInvoke refers to the technique used to call functions of native unmanaged libraries such as the Windows API.

To PInvoke a function, you must declare it in your .NET code. That declaration is called the Managed Signature. To complete the managed signature, you need to know the following information about the function:

  1. The library file which the function resides in.
  2. Function name.
  3. Return type of the function.
  4. Input parameters.
  5. Other relevant information such as encoding.

Here comes a question, how could we handle types in unmanaged code that aren’t available in .NET (e.g. BOOL, LPCTSTR, etc.)?

The solution is in Marshaling. Marshaling is the process of converting unmanaged types into managed and vice versa (see figure 1.) That conversion can be done in many ways based on the type to be converted. For example, BOOL can simply be converted to System.Boolean, and LPCTSTR can be converted to System.String, System.Text.StringBuilder, or even System.Char[]. Compound types (like structures and unions) are usually don’t have counterparts in .NET code and thus you need to create them manually. Read our book about marshaling here.

Figure 1 - The Marshaling Process
Figure 1 – The Marshaling Process

To understand P/Invoke very well, we’ll take an example. The following code switches between mouse button functions, making the right button acts as the primary key, while making the left button acts as the secondary key.

In this code, we’ll use the SwapMouseButtons() function of the Win32 API which resides in user32.dll library and has the following declaration:

BOOL SwapMouseButton(
    BOOL fSwap
    );

Of course, the first thing is to create the managed signature (the PInvoke method) of the function in .NET:

// C#
[System.Runtime.InteropServices.DllImport("user32.dll")]
static extern bool SwapMouseButton(bool fSwap);
' VB.NET
Declare Auto Function SwapMouseButton Lib "user32.dll" _
    (ByVal fSwap As Boolean) As Boolean

Then we can call it:

// C#

public void MakeRightButtonPrimary()
{
    SwapMouseButton(true);
}

public void MakeLeftButtonPrimary()
{
    SwapMouseButton(false);
}
' VB.NET

Public Sub MakeRightButtonPrimary()
    SwapMouseButton(True)
End Sub

Public Sub MakeLeftButtonPrimary()
    SwapMouseButton(False)
End Sub

Interop with COM Components

The other form of unmanaged interoperation is the COM Interop. COM Interop is very large and much harder than P/Invoke and it has many ways to implement. For the sake of our discussion (this is just a sneak look at the technique,) we’ll take a very simple example.

COM Interop includes all COM-related technologies such as OLE, COM+, ActiveX, etc.

Of course, you can’t talk directly to unmanaged code. As you’ve seen in Platform Invocation, you have to declare your functions and types in your .NET code. How can you do this? Actually, Visual Studio helps you almost with everything so that you simply to include a COM-component in your .NET application, you go to the COM tab of the Add Reference dialog (figure 2) and select the COM component that you wish to add to your project, and you’re ready to use it!

Figure 2 - Adding Reference to SpeechLib Library
Figure 2 – Adding Reference to SpeechLib Library

When you add a COM-component to your .NET application, Visual Studio automatically declares all functions and types in that library for you. How? It creates a Proxy library (i.e. assembly) that contains the managed signatures of the unmanaged types and functions of the COM component and adds it to your .NET application.

The proxy acts as an intermediary layer between your .NET assembly and the COM-component. Therefore, your code actually calls the managed signatures in the proxy library that forwards your calls to the COM-component and returns back the results.

Keep in mind that proxy libraries also called Primary Interop Assemblies (PIAs) and Runtime Callable Wrappers (RCWs.)

Best mentioning that Visual Studio 2010 (or technically, .NET 4.0) has lots of improved features for interop. For example, now you don’t have to ship a proxy/PIA/RCW assembly along with your executable since the information in this assembly can now be embedded into your executable; this is what called, Interop Type Embedding.

Of course, you can create your managed signatures manually, however, it’s not recommended especially if you don’t have enough knowledge of the underlying technology and the marshaling of functions and types (you know what’s being said about COM!)

As an example, we’ll create a simple application that reads user inputs and speaks it. Follow these steps:

  1. Create a new Console application.
  2. Add a reference to the Microsoft Speech Object Library (see figure 2.)
  3. Write the following code and run your application:
// C#

using SpeechLib;

static void Main()
{
    Console.WriteLine("Enter the text to read:");
    string txt = Console.ReadLine();
    Speak(txt);
}

static void Speak(string text)
{
    SpVoice voice = new SpVoiceClass();
    voice.Speak(text, SpeechVoiceSpeakFlags.SVSFDefault);
}
' VB.NET

Imports SpeechLib

Sub Main()
    Console.WriteLine("Enter the text to read:")
    Dim txt As String = Console.ReadLine()
    Speak(txt)
End Sub

Sub Speak(ByVal text As String)
    Dim voice As New SpVoiceClass()
    voice.Speak(text, SpeechVoiceSpeakFlags.SVSFDefault)
End Sub

If you are using Visual Studio 2010 and .NET 4.0 and the application failed to run because of Interop problems, try disabling Interop Type Embedding feature from the properties on the reference SpeechLib.dll.

Interop with ActiveX Controls

ActiveX is no more than a COM component that has an interface. Therefore, nearly all what we have said about COM components in the last section can be applied here except the way we add ActiveX components to our .NET applications.

To add an ActiveX control to your .NET application, you can right-click the Toolbox, select Choose Toolbox Items, switch to the COM Components tab and select the controls that you wish to use in your application (see figure 3.)

Figure 3 - Adding WMP Control to the Toolbox
Figure 3 – Adding WMP Control to the Toolbox

Another way is to use the aximp.exe tool provided by the .NET Framework (located in Program FilesMicrosoft SDKsWindowsv7.0Abin) to create the proxy assembly for the ActiveX component:

aximp.exe "C:WindowsSystem32wmp.dll"

Not surprisingly, you can create the proxy using the way for COM components discussed in the previous section, however, you won’t see any control that can be added to your form! That way creates control class wrappers for unmanaged ActiveX controls in that component.

Summary

So, unmanaged code interoperation comes in two forms: 1) PInvoke: interop with native libraries including the Windows API 2) COM-interop which includes all COM-related technologies like COM+, OLE, and ActiveX.

To PInvoke a method, you must declare it in your .NET code. The declaration must include 1) the library which the function resides in 2) the return type of the function 3) function arguments.

COM-interop also need function and type declaration and that’s usually done for you by the Visual Studio which creates a proxy (also called RCW and PIA) assembly that contains managed definitions of the unmanaged functions and types and adds it to your project.

Where to go next

Read more about Interoperability here.

More from this series:

.NET Interoperability at a Glance 2 – Managed Code Interoperation

هذه المقالة متوفرة أيضا باللغة العربية، اقرأها هنا.

See more Interoperability examples here.

Contents

Contents of this article:

  • Contents
  • Read also
  • Overview
  • Introduction
  • Forms of Interop
  • Managed Code Interop
  • Summary
  • Where to go next

Read also

More from this series:

Overview

In the previous article, you learnt what interoperability is and how it relates to the .NET Framework. In this article, we’re going to talk about the first form of interoperability, the Managed Code Interop. In the next article, we’ll talk about the other forms.

Introduction

So, to understand Interoperation well in the .NET Framework, you must see it in action. In this article, we’ll talk about the first form of .NET interoperability and see how to implement it using the available tools.

Just a reminder, Interoperability is the process of communication between two separate systems. In .NET Interop, the first system is always the .NET Framework; the other system might be any other technology.

Forms of Interop

Interoperability in .NET Framework has two forms:

  • Managed Code Interoperability
  • Unmanaged Code Interoperability

Next, we have a short discussion of each of the forms.

Managed Code Interop

This was one of the main goals of .NET Framework. Managed Code Interoperability means that you can easily communicate with any other .NET assembly no matter what language used to build that assembly.

Not surprisingly, because of the nature of .NET Framework and its runtime engine (the CLR,) .NET code supposed to be called Managed Code, while any other code is  unmanaged.

To see this in action, let’s try this:

  1. Create a new Console application in the language you like (C#/VB.NET.)
  2. Add a new Class Library project to the solution and choose another language other than the one used in the first project.
  3. In the Class Library project, add the following code (choose the suitable project):
    // C#
    
    public static class Hello
    {
        public static string SayHello(string name)
        {
            return "Hello, " + name;
        }
    }
    ' VB.NET
    
    Public Module Hello
        Public Function SayHello(ByVal name As String) As String
            Return "Hello, " & name
        End Function
    End Module
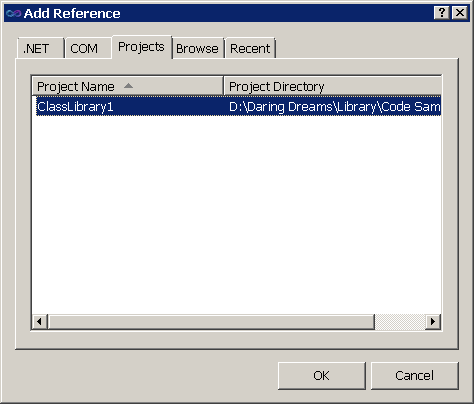
  4. Now, go back to the Console application. Our goal is to call the function we have added to the other project. To do this, you must first add a reference to the library in the first project. Right-click the Console project in Solution Explorer and choose Add Reference to open the Add Reference dialog (figure 1.) Go to the Projects tab and select the class library project to add it.

    Figure 1 - Add Reference to a friend project
    Figure 1 - Add Reference to a friend project
  5. Now you can add the following code to the Console application to call the SayHello() function of the class library.
    // C#
    
    static void Main()
    {
        Console.WriteLine(ClassLibrary1.Hello.SayHello("Mohammad Elsheimy"));
    }
    ' VB.NET
    
    Sub Main()
        Console.WriteLine(ClassLibrary1.Hello.SayHello("Mohammad Elsheimy"))
    End Sub

How this happened? How could we use the VB.NET module in C# which is not available there (or the C#’s static class in VB which is not available there too)?

Not just that, but you can inherit C# classes from VB.NET (and vice versa) and do all you like as if both were created using the same language. The secret behind this is the Common Intermediate Language (CIL.)

When you compile your project, the compiler actually doesn’t convert your C#/VB.NET code to instructions in the Machine language. Rather, it converts your code to another language of the .NET Framework, which is the Common Intermediate Language. The Common Intermediate Language, or simply CIL, is the main language of .NET Framework which inherits all the functionalities of the framework, and which all other .NET languages when compiled are converted to it.

So, the CIL fits as a middle layer between your .NET language and the machine language. When you compile your project, the compiler converts your code to CIL statements and emits them in assembly file. In runtime, the compiler reads the CIL from the assembly and converts them to machine-readable statements.

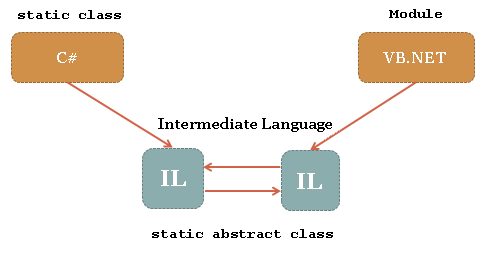
How CIL helps in interoperation? The communication between .NET assemblies is now done through the CIL of the assemblies. Therefore, you don’t need to be aware of structures and statements that are not available in your language since every statement for any .NET language has a counterpart in IL. For example, both the C# static class and VB.NET module convert to CIL static abstract class (see figure 2.)

Figure 2 - CIL and other .NET languages

Managed Interop is not restricted to C# and VB.NET only; it’s about all languages run inside the CLR (i.e. based on .NET Framework.)

If we have a sneak look at the CIL generated from the Hello class which is nearly the same from both VB.NET and C#, we would see the following code:

.class public abstract auto ansi sealed beforefieldinit ClassLibrary1.Hello
       extends [mscorlib]System.Object
{

    .method public hidebysig static string  SayHello(string name) cil managed
    {
      // Code size       12 (0xc)
      .maxstack  8
      IL_0000:  ldstr      "Hello, "
      IL_0005:  ldarg.0
      IL_0006:  call       string [mscorlib]System.String::Concat(string,
                                                              string)
      IL_000b:  ret
    } // end of method Hello::SayHello

} // end of class ClassLibrary1.Hello

On the other hand, this is the code generated from the Main function (which is also the same from VB.NET/C#):

.class public abstract auto ansi sealed beforefieldinit ConsoleApplication1.Program
       extends [mscorlib]System.Object
{

    .method private hidebysig static void  Main() cil managed
    {
      .entrypoint
      .maxstack  8
      IL_0000:  ldstr      "Mohammad Elsheimy"
      IL_0005:  call       string [ClassLibrary1]ClassLibrary1.Hello::SayHello(string)
      IL_000a:  call       void [mscorlib]System.Console::WriteLine(string)
      IL_000f:  ret
    } // end of method Program::Main

} // end of class ConsoleApplication1.Program

You can use the ILDasm.exe tool to get the CIL code of an assembly. This tool is located in Program FilesMicrosoft SDKsWindows<version>bin.

Here comes a question, is there CIL developers? Could we write the CIL directly and build it into .NET assembly? Why we can’t find much (if not any) CIL developers? You can extract the answer from the CIL code itself. As you see, CIL is not so friendly and its statements are not so clear. Plus, if we could use common languages to generate the CIL, we we’d like to program in CIL directly? So it’s better to leave the CIL for the compiler.

Now, let’s see the other form of .NET interoperation, Unmanaged Code Interoperability.

Summary

So, the secret of Managed Code Interoperation falls in the Common Intermediate Language or CIL. When you compile your code, the compiler converts your C#/VB.NET (or any other .NET language) to CIL instructions and saves them in the assembly, and that’s the secret. The linking between .NET assemblies of different languages relies on the fact that the linking is actually done between CILs of the assemblies. The assembly code doesn’t (usually) have any clue about the language used to develop it. In the runtime, the compiler reads those instructions and converts them to machine instructions and execute them.

Next, we’ll talk about the other form of .NET Interoperation, it’s the interoperation with unmanaged code.

Where to go next

Read more about Interoperability here.

More from this series:

.NET Interoperability at a Glance 1 – Introduction

هذه المقالة متوفرة أيضا باللغة العربية، اقرأها هنا.

See more Interoperability examples here.

Contents

Contents of this article:

  • Contents
  • Read also
  • Overview
  • Introduction
  • Summary
  • Where to go next

Read also

More from this series:

Overview

.Net Framework Logo
Image via Wikipedia

In this article and the few following it, we’ll try to take a tour in Interoperability in .NET Framework.

In this lesson, we’ll start by an introduction to the concept of Interoperability. In the next few lessons, we’ll have a look at Interoperability and how it fits into the .NET Framework and other technologies.

Since Interoperability is a very huge topic and cannot be covered in just a few articles, we’ll concentrate on Interoperability in .NET Framework (not any other technologies) and summarize its uses.

Here we go!

Introduction

Let’s get hands on the concept of Interoperability and it’s relation to the .NET Framework.

Concept

Interoperability (reduced to Interop) is the ability of two diverse systems or different systems to communicate (i.e. inter-operate) with each other. When I say ‘two systems’ I assume that the first one is always the .NET Framework, since we are interested in .NET and also the interoperability is a very huge topic and cannot be summarized in just a few articles. The other system might be any other software, component, or service based on any technology other than the .NET Framework. For example, we could interoperate with Win32 API, MFC applications, COM/ActiveX components, and so on.

So we have two different systems, the first is the .NET Framework, while the other is any other technology. Our goal is to communicate with that stranger; that’s the main goal of Interoperability in .NET Framework.

Goals and Benefits

Here comes a question (or a few questions!), why do I need interoperation? Why I do need to communicate with other systems at all? If I need specific features, couldn’t I just use existing functionalities of .NET Framework to accomplish my tasks? I can even redevelop them!

We can summarize the answer of those questions in a few points:

  • First, in many cases, you can’t redevelop those components because the functionalities they offer is either very difficult (sometimes impossible) or maybe you don’t sufficient knowledge to redevelop them! Unless if you are very brilliant and have enough knowledge of the Assembly language, you can develop your API that would replace current system API, and then you’ll have also to interoperate with your API to be able to call it from your .NET Framework application.
  • If you’re not convinced yet, this is should be for you. You might be not having enough time to redevelop the component that may take a very long time and effort to complete. Imagine how much time would take to code, debug, and test your component. Plus, you can rely on existing components and trust them, many bugs can appear in your code from time to time and you’ll have to fix them all!
  • Other 3rd party component might not exist, or maybe the company you work for require you to use such those components.
  • You don’t need to reinvent the wheel, do you?

So, including Interop code in your .NET projects is sometimes inevitable (especially when working with Windows API) that you definitely can’t keep yourself away from them.

Summary

So you have now basic understanding of what Interoperability means. As a reminder, Interoperability is the process of two diverse systems communicate with each other. For us, the first system is the .NET Framework. The other system is any other technology (Windows API, MFC, COM/ActiveX, etc.)

You can’t live without Interop, actually you did some interoperation in your work (you may be actually do that every day.)

Now you are ready to take a look at how Interop fits in .NET Framework.

Where to go next

Read more about Interoperability here.

More from this series:

Setting Device Information in MCI

هذه المقالة متوفرة أيضا باللغة العربية، اقرأها هنا.

Interested in MCI multimedia processing? First check this article out if you didn’t:

Creating a Sound Recorder in C and C#

After we received your feedbacks and comments about th.e article, we decided to add a small appendix to the end of the article about setting information (volume, channel, sampling rate, etc.) to a MCI device (a Waveform device of course.)

Like anything else in MCI, you can set device information using a MCI command (string/numeric), and this time it’s the MCI_SET command.

This command is used to set information about a specific device. This command requires an input parameter of the MCI_SET_PARMS structure. However, that input parameter might have extended members for specific devices. Because we are concentrating of Waveform devices, so we are going to use the MCI_WAVE_SET_PARMS structure that contains the extended members for our device and is defined as following:

typedef struct {
    DWORD_PTR dwCallback;
    DWORD     dwTimeFormat;
    DWORD     dwAudio;
    UINT      wInput;
    UINT      wOutput;
    WORD      wFormatTag;
    WORD      wReserved2;
    WORD      nChannels;
    WORD      wReserved3;
    DWORD     nSamplesPerSec;
    DWORD     nAvgBytesPerSec;
    WORD      nBlockAlign;
    WORD      wReserved4;
    WORD      wBitsPerSample;
    WORD      wReserved5;
} MCI_WAVE_SET_PARMS;

This structure contains all and every little piece of information that can be set to a device. I expect that you read the main article and you are already familiar with members like dwCallback (other members are self-explanatory) that we have talked about many times, and you are fine too with function calls and setting up input parameters, so I won’t get into the discussion of the structure or how you are going to use that command. However, if you need more help setting up the input parameters for the structure, you should take a brief look at the MCI_WAVE_SET_PARMS Structure documentation in the MSDN.

As you know, the MCI_WAVE_SET_PARMS unmanaged structure can be marshaled in C# as following:

[StructLayout(LayoutKind.Sequential, CharSet = CharSet.Ansi)]
public struct MCI_WAVE_SET_PARMS
{
    public IntPtr dwCallback;
    public uint     dwTimeFormat;
    public uint     dwAudio;
    public uint      wInput;
    public uint      wOutput;
    public ushort      wFormatTag;
    public ushort      wReserved2;
    public ushort      nChannels;
    public ushort      wReserved3;
    public uint     nSamplesPerSec;
    public uint     nAvgBytesPerSec;
    public ushort      nBlockAlign;
    public ushort      wReserved4;
    public ushort      wBitsPerSample;
    public ushort      wReserved5;
}

Congratulations! You did set the device information! So how to get them back?

This can be done through the MCI_STATUS (discussed earlier) by setting up the MCI_STATUS_ITEM flag and setting the query item to the required information you need to query about (like MCI_DGV_STATUS_VOLUME to query about volume.)

More about the MCI_STATUS command can be found in the MSDN documentation.

Serialization vs. Marshaling

هذه المقالة متوفرة أيضا باللغة العربية، اقرأها هنا.

Overview

Are you somewhat confused between Serialization and Marshaling? This writing would break this confusion up, it would give you a basic understanding of the process of Serialization and the process of Marshaling, and how you can get the most out of each.

Serialization

Serialization is the process of converting a data structure or object into a sequence of bits so that it can be stored in a file, a memory buffer, or transmitted across a network connection to be “resurrected” later in the same or another computer environment. And this sequence of bits can be of any format the user chooses; however, they are usually formed as XML or binary.

Serialization comes in many forms in .NET Framework, it can be observed in ADO.NET, Web services, WCF services, Remoting, and others.

For example, calling the WriteXml() function of a DataSet serializes this DataSet into a XML file.

    ds.WriteXml("data.xml");

And if we have such this structure:

    public struct User
    {
        public int id;
        public string name;
    }

we can get the following results if we serialize a collection of that structure into XML:


        12
        Mark
    
    
        13
        Charles
    
    
        14
        John
    

Serialization can be observed in Web and WCF services too. The request and parameter information for a function are serialized into XML, and when the function returns the response and the returned data too are serialized into XML. Actually, you don’t have to think about these XML data, CLR handles this for you.

In the same vein, when it comes to Remoting, the sender and recipient must agree to the same form of XML data. That’s, when you send some data CLR serializes this data for you before it sends it to the target process. When the target process receives this XML data, it turns it back (deserializes it) to its original form to be able to handle it.

Thus, the process of converting data structures and objects into series of bits is called Serialization. The reverse of this process, converting these bits back to the original data structures and objects, is called Deserialization.

Therefore, the following ADO.NET line does deserializes the XML file:

    DataSet ds;
    ds.ReadXml("data.xml");

And when your application receives response from the server or from another process, the CLR deserializes that XML data for you.

So why XML is preferred over binary serialization? That’s because XML is text-based. Thus, it’s free to be transmitted from a process to another or via a network connection, and firewalls always allow it.

Marshaling

Marshaling is the process of converting managed data types to unmanaged data types. There’re big differences between the managed and unmanaged environments. One of those differences is that data types of one environment is not available (and not acceptable) in the other.

For example, you can’t call a function like SetWindowText() -that sets the text of a given window- with a System.String because this function accepts LPCTSTR and not System.String. In addition, you can’t interpret (handle) the return type, BOOl, of the same function, that’s because your managed environment (or C# because of the context of this writing) doesn’t have a BOOL, however, it has a System.Boolean.

To be able to interact with the other environment, you will need to not to change the type format, but to change its name.

For example, a System.String is a series of characters, and a LPCTSTR is a series of characters too! Why not just changing the name of the data type and pass it to the other environment?

Consider the following situation. You have a System.String that contains the value €œHello€:

System.String str = "Hello";

The same data can be represented in an array of System.Char too, like the following line:

System.Char[] ch = str.ToCharArray();

So, what is the difference between that System.String variable and that System.Char array? Nothing. Both contain the same data, and that data is laid-out the same way in both variables. That’s what Marshaling means.

So what is the difference between Serialization and Marshaling?

C# has a System.Int32, and Windows API has an INT, and both refer to a 32-bit signed integer (on 32-bit machines.) When you marshal the System.Int32 to INT, you just change its type name, you don’t change its contents, or lay it in another way (usually.) When you serialize a System.Int32, you convert it to another form (XML for instance,) so it’s completely changed.

Summary

Look, after I get back to Wikipedia documentation for Marshaling, I realized that my answer was so specific to C#!

I mean that, Marshaling is a very general term used to describe transformations of memory. Theoretically, it’s more general than Serialization. In Python for instance, the terms Marshaling and Serialization are used interchangeably. There (in Python,) Marshaling = Serialization, and Serialization = Marshaling, there’s no difference. In computer methodology, there’s a silent difference between Marshaling and Serialization (check the Wikipedia definition.)

So what is that System.MarshalByRefObject class? Why that name -specifically- was used? First, System.MarshalByRefObject class allows objects to be passed by reference rather than by value in applications that use Remoting.

Personally, I like to say that Microsoft .NET Framework team’s name was very scientific when they have called that object “MarshalByRefObject” with respect to that silent difference between serialization and marshaling or maybe that name was derived from Python, dunno!

After all, we should keep in mind that in .NET methodology, there’s a big difference between Serialization and Marshaling, Marshaling usually refers to the Interop Marshaling. In .NET Remoting, it refers to that serialization process.

By the way, Marshalling is so named because it was first studied in 1962 by Edward Waite Marshall, then with the General Electric corporation.

That’s all.

Have a nice day!

Microsoft Agent; Providing a Custom Popup Menu

هذه المقالة متوفرة أيضا باللغة العربية، اقرأها هنا.

A second honeymoon with Microsoft Agent. Do you remember our article Programming Microsoft Agent in WinForms and our sample application PartIt? After you have included your desired agent in your application, are you feeling bad with the default popup menu? If so, then you are in the right place (welcome :).)

Enough talking, let’s get to work! First, prepare your code that loads the Microsoft Agent and brings it to the screen.

After that, create your System.Windows.Forms.ContextMenuStrip and add your required items (well, including ‘Hide’ maybe) and finish the item event handlers.

Now, let’s complete it. Get to the code that loads the agent character (e.g. calls the Characters.Load() method of the agent control object, AxAgentObjects.AxAgent) and just disable the AutoPopupMenu flag/property of the character object, AgentObjects.IAgentCtlCharacterEx. This flag/property determines whether to allow the default popup menu or not.

For example, the following code disables this property:

    AxAgentObjects.AxAgent agentCtl;
    AgentObjects.IAgentCtlCharacterEx agentChar;

    // initializing 'agentCtl'
    // . . .

    agentCtl.Characters.Load("Merlin", "merlin.acs");
    agentChar = agentCtl.Characters.Character("Merlin");
    agentChar.AutoPopupMenu = false;

Next comes the interesting point. When the character is clicked, the ClickEvent event of the agent control (AxAgent) fires. So the next step is to handle this event and to provide your code that brings up your custom context menu. Consider the following code:

// agentCtl.ClickEvent += agent_ClickEvent;

public void agentCtl_ClickEvent(object sender, AxAgentObjects._AgentEvents_ClickEvent e)
{
    if (e.characterID == "Merlin")  // check for this if you have many characters
    {
        if (e.button == 2) // 1 = left, 2 = right
        {
            myContextMenu.Show(e.x, e.y);
        }
    }
}

Well done!

Have a nice Sunday!

Hard Links vs. Soft Links

Contents

Contents of this writing:

  • Contents
  • Overview
  • Introducing Hard Links
  • Introducing Soft Links
  • Creating a Hard Link
  • Creating a Soft Link

Overview

This writing talks about hard links and soft links; two of the nice features of NTFS file system.

You can divide file links into two categories:

  • Normal Links (shortcuts)
  • Symbolic Links:
    This divided into two subcategories:

    • Hard Links (for files)
    • Soft Links (for directories)

Introducing Hard Links

A hard link is a way to represent a single file (i.e. data volume) by more than one path. In other words, it is a way to create multiple directory entries for a single file.

Consider the following example, we could have two files, e.g. D:DocumentsBills.doc and D:FilesCompanyInvoices.doc, both files represent the same data, so when you change one file the other changes too!

A hard link is almost like a normal link (i.e. shortcut) but there is a big difference. If you delete the source file of a shortcut, the shortcut would be broken (points to a non-existing file.) A hard link on the other hand, would be still working fine if you delete the source file as if it was just a copy.

Notice that, hard disk space is not multiplied for each hard link. Because they are share the same data volume, they share the same size.

There is something that you should be aware of. File attributes are not updated for each of the hard links. This means that if you set a hard link (e.g. D:FilesCompanyInvoices.doc) to read-only, it is the only link that is set to this attribute. Other hard links including the source would be still read-write (unless you set them too.)

Hard links are only supported on NTFS file system; they are not supported by Win9x versions of Windows. Besides this, hard links creation is limited to the same local disk (or network drive) of the source file. For example, you cannot create a hard link on the C: drive for a file on the drive D: or on a network share.

Introducing Soft Links

Soft links (also called junctions,) are identical to hard links except that soft links are designated for directories not files.

For example, if you have one or more soft links to the directory D:Tools (e.g. D:Software and D:ProgramsTools,) all directories (including the source) would be updated when any one of them changes. That is, if you created a new file in one directory, it is created in all directory links, and so on.

Like hard links, soft links require NTFS file system. Plus, deleting the source directory does not affect other directories, all links share the same data volume, changing attributes of one directory does not be applied to others.

Unlike hard links, creating soft links is a special feature of Windows Vista and Windows Server 2008 (and future versions of course.) Therefore, it cannot be applied to earlier versions of Windows (like Windows XP or Windows Server 2003.)

Creating a Hard Link

Unfortunately, neither hard links nor soft links are supported by the .NET Framework. Therefore, you will need to dig into the Windows API to allow your application to consume this feature.

You can create a hard link using a single line of code using a simple call to the Win32 function, CreateHardLink(), that resides in the Kernel32.dll library. The definition of this function is as follows:

BOOL CreateHardLink(
    LPCTSTR lpFileName,
    LPCTSTR lpExistingFileName,
    LPSECURITY_ATTRIBUTES lpSecurityAttributes
    );

This function accepts three arguments;

  • lpFileName:
    The path of the new hard link to be created. Notice that, it should be resides in the location (local disk or network share) as the source file.
  • lpExistingFileName:
    The path of the source file to create the hard link from.
  • lpSecurityAttributes:
    The security descriptor for the new file. Till now, it is reserved for future use and it should not be used.

This function returns TRUE if succeeded or FALSE otherwise.

Keeping the definition of the function in our minds, we can create its PInvoke method in C#. Simply, this is our C# PInvoke method:

[DllImport("Kernel32.dll", CharSet = CharSet.Unicode )]
static extern bool CreateHardLink(
    string lpFileName,
    string lpExistingFileName,
    IntPtr lpSecurityAttributes
    );

As you know, we have set the character encoding to Unicode because Windows NT allows Unicode file names. In addition, we have marshaled lpSecurityAttributes as System.IntPtr to allow passing it a null value using System.IntPtr.Zero.

Then, you simply call the function:

Change the source file to meet an existing file into your system. In addition, check that the directory of the new link exists or the call would fail.

Take into consideration that the function creates the new file for you, it should not be found or the function would fail (as the case with soft links.)

CreateHardLink(
    "D:\Files\Company\Invoices.doc",	// New Link
    "D:\Documents\Bills.doc",			// Source
    IntPtr.Zero);

And this is another link:

CreateHardLink(
    "D:\Important\Work Invoices.doc",			// New Link
    "D:\Files\Company\Invoices.doc",			// Source
    IntPtr.Zero);

As you see, it does not matter if you created the new link from the original file or from another link.

Now try to change any of the links, and check the others. They are all updated at the time you commit the change (save the file, for instance.)

Creating a Soft Link

Like hard links, you can create a soft link (a junction) using a single call to a Win32 API function; it is CreateSymbolicLink() function. Again, this function is only supported by Windows Vista and Windows Server 2008 (and future versions.)

Actually, the function CreateSymbolicLink() can be used to create both types of symbolic links, hard and soft links. The definition of this function is as follows:

BOOLEAN WINAPI CreateSymbolicLink(
    LPTSTR lpSymlinkFileName,
    LPTSTR lpTargetFileName,
    DWORD dwFlags
    );

This function accepts three arguments, the first and the second are identical to the CreateHardLink() function:

  • lpSymlinkFileName:
    The path of the new link (file or directory) that resides in the same drive (local disk or network share) of the target file.
  • lpTargetFileName:
    The path of the existing source (file or directory.)
  • dwFlags:
    The type of symbolic link. It can take the following values:

    • 0x0:
      The link is a hard link (source and destination are files.)
    • 0x1 = SYMBOLIC_LINK_FLAG_DIRECTORY:
      The link is a soft link (source and destination are directories.)

The following is the PInvoke method for our function:

[DllImport("Kernel32.dll", CharSet = CharSet.Unicode)]
static extern bool CreateSymbolicLink(
    string lpSymlinkFileName,
    string lpTargetFileName,
    uint dwFlags
    );

const uint SYMBLOC_LINK_FLAG_FILE		= 0x0;
const uint SYMBLOC_LINK_FLAG_DIRECTORY 	= 0x1;

The following code creates two soft links for one directory:

Again, the source should be the only directory that exists in your machine or the function would fail.

CreateSymbolicLink(
    "D:\Software",         // New Link
    "D:\Tools",            // Source
    SYMBOLIC_LINK_FLAG_DIRECTORY);

// Source
CreateSymbolicLink(
    "D:\Programs\Tools",  // New Link
    "D:\Software",         // Source
    SYMBOLIC_LINK_FLAG_DIRECTORY);

Now try changing one directory, other links change too. Try deleting the source, nothing would be happen to the other links.